Online tutorials make garage door spring replacement look manageable. The tools seem simple, the steps appear straightforward, and the cost savings look real. What those videos rarely show is what happens when something goes wrong, and with garage door springs, the consequences of an error are severe enough that this is one repair that belongs exclusively in professional hands. At Garage Door and More, we’re direct with homeowners about this: spring repair is not a project where the risk is worth the savings, and we’ve seen the results when it goes wrong.
What Makes Garage Door Springs So Dangerous?
Garage door springs store and release mechanical energy to counterbalance a door that can weigh between 150 and 400 pounds. Torsion springs, the horizontal coil springs mounted on a shaft above the door, operate under hundreds of pounds of torque even when the door is fully closed. Extension springs, which run along the horizontal tracks on each side, stretch under significant load every time the door moves.
The energy stored in a torsion spring under full tension is roughly equivalent to the kinetic energy of a car moving at highway speed compressed into a small metal coil. When that energy releases unexpectedly, whether from a tool slip, an incorrect winding, or mishandled hardware, the result is a violent and instantaneous release that the human body cannot react to in time. This is not a theoretical risk. Emergency rooms see garage door spring injuries regularly, and the injuries tend to be serious: broken bones, lacerations, and worse.
“We get calls a few times a year from homeowners or family members after a DIY spring attempt has gone wrong. Sometimes it’s a winding bar that slipped. Sometimes it’s a spring that released during removal. The injuries we hear about aren’t minor. This is one of the few times we’ll tell someone directly: please don’t try this yourself.” — The Team at Garage Door and More
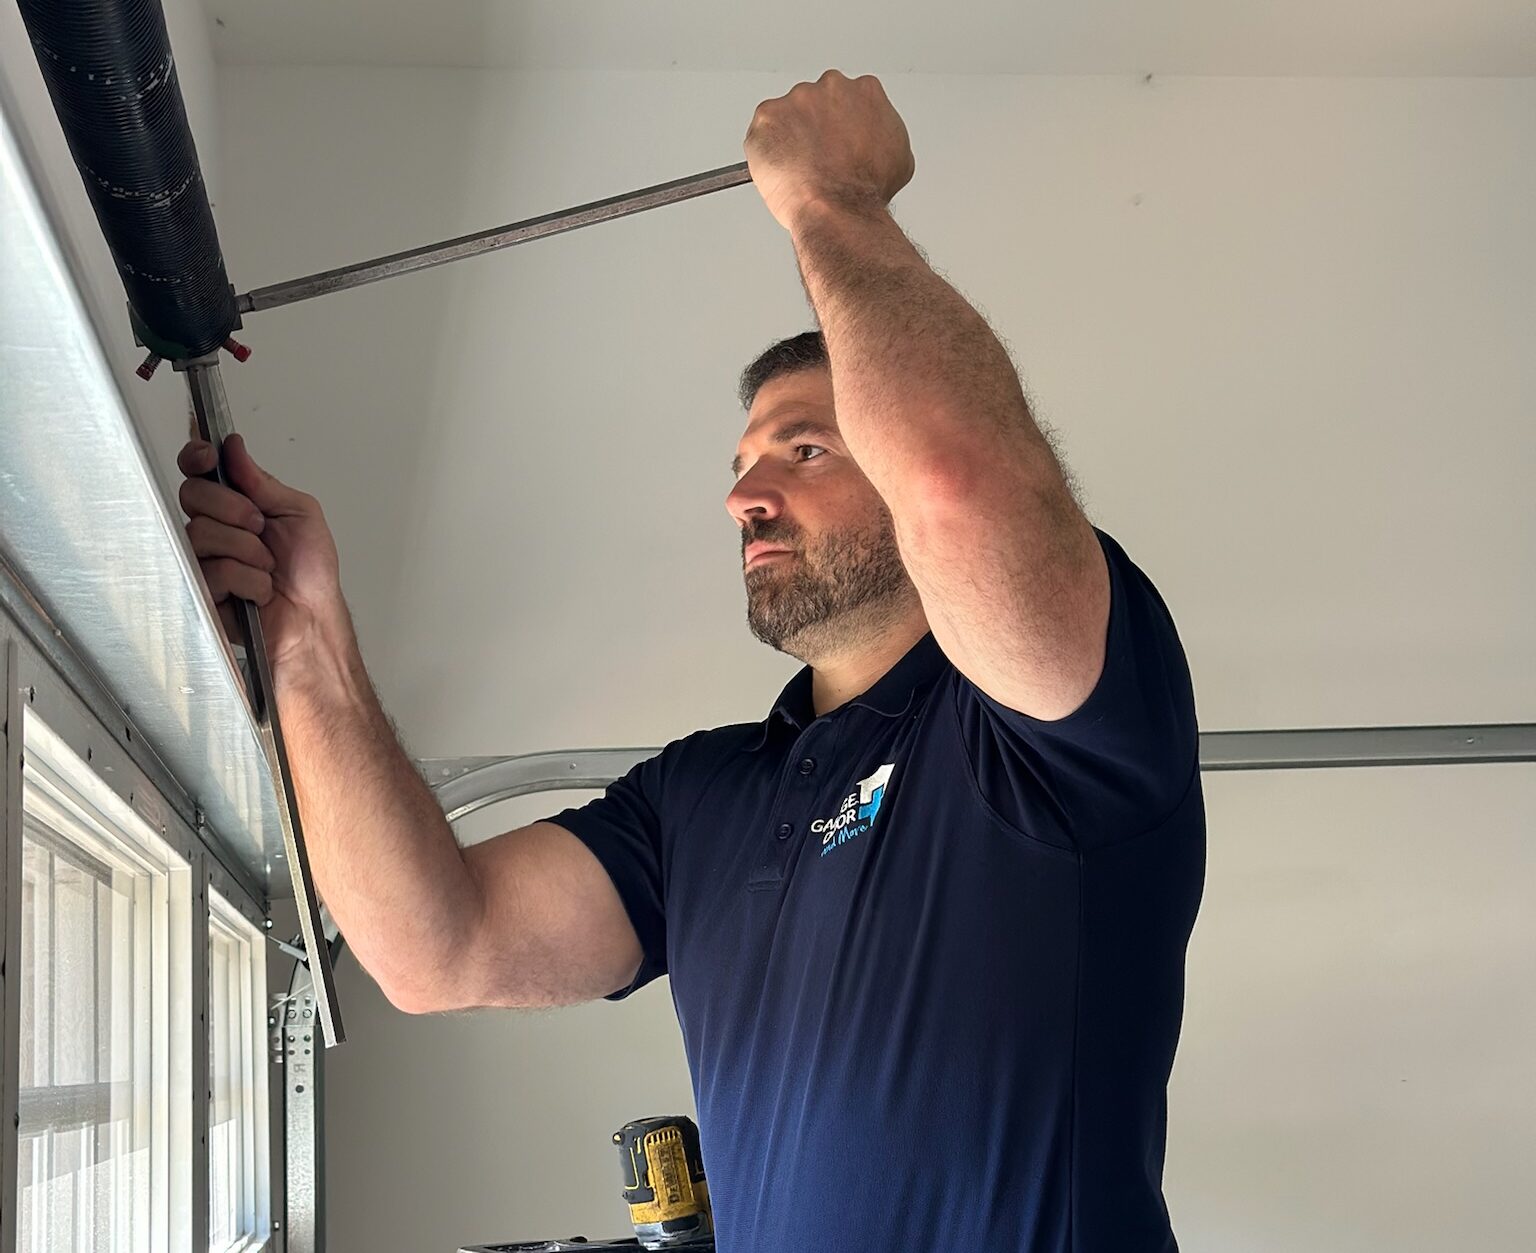
What Tools Are Actually Required and Why That Matters
Torsion spring replacement requires winding bars, specifically sized steel bars inserted into the winding cone at the end of the spring to wind or unwind tension in controlled increments. Using the wrong size, using a screwdriver as a substitute, or losing grip at any point during winding transfers the full spring tension directly to whoever is holding the bar.
The winding process requires applying significant force in quarter-turn increments while standing to the side of the spring, not in front of it, because a slip sends the winding bar forward at the velocity of a projectile. Professional technicians know this positioning instinctively. Someone learning from a video does not have the muscle memory or situational awareness that comes from doing this work repeatedly.
Beyond winding bars, proper spring replacement requires a torque wrench for setting hardware to specification, a spring tension gauge, and knowledge of the correct tension setting for the specific door weight. An incorrectly tensioned spring doesn’t just wear out faster; it puts uneven load on the opener, the cables, and the drums on every subsequent cycle.
Why “I Watched a Video” Isn’t Adequate Preparation
Video tutorials compress real-world complexity. They’re filmed by experienced technicians under controlled conditions, usually on doors in good shape with no complicating factors. They don’t show what happens when a cable drum is worn, when the shaft hardware is corroded, when the winding cone set screws are stripped, or when the door is slightly off-balance in a way that changes the tension calculation. Any of these situations, which are common on doors that need spring replacement, require on-the-spot judgment that only comes from experience.
Specific scenarios where DIY spring attempts go wrong:
- Incorrect spring size: Springs are spec’d to the door’s weight and drum size. Installing the wrong spring creates a door that’s either over- or under-tensioned, causing the opener to struggle, accelerating wear on cables and drums, and creating an imbalanced door that can drop unexpectedly.
- Winding bar slip: A winding bar that loses contact with the cone during tensioning releases violently. This is the most common cause of serious DIY spring injuries.
- Failure to secure the door before work: The door must be clamped or secured before spring tension is removed. An unsecured door on a broken spring can drop suddenly when the second spring’s tension changes during the repair.
- Ignoring cable and drum condition: Springs and cables wear together. A technician replacing springs also checks cables, drums, and bearing plates for wear. A DIYer focused on the spring often misses secondary wear that causes a follow-up failure weeks later.
- Incorrect set screw torque: Set screws that are under-torqued allow the spring to slip on the shaft during operation. Over-torqued screws can crack the winding cone. Both create dangerous conditions.
The Cost Comparison Doesn’t Hold Up Under Scrutiny
The typical justification for DIY spring replacement is cost savings. A professional torsion spring replacement in Charlotte runs $175 to $325 for both springs including labor. Springs themselves purchased online or at a hardware store cost $50 to $100 for a pair, so the apparent savings look like $125 to $225.
That calculation ignores several real costs:
Hidden costs in the DIY spring replacement math:
| Cost Factor | DIY | Professional |
|---|---|---|
| Spring parts | $50 – $100 (often wrong size first attempt) | Included in service price |
| Winding bars (required) | $25 – $50 | Not applicable |
| Risk of incorrect spring spec | Second purchase if wrong size ordered | Technician measures and brings correct spring |
| Secondary damage (cables, drums) | Often missed, causes follow-up failure | Inspected and flagged during service |
| Injury risk | Significant; potential ER visit | None for homeowner |
| Total professional service | — | $175 – $325 for both springs |
When you factor in the tool cost, the risk of ordering the wrong spring, and the real probability of missing secondary wear that a technician would catch, the actual savings narrow to a range where the remaining gap doesn’t justify the injury risk.
“The calls we get after a DIY attempt that went sideways are always more expensive than the original spring replacement would have been. Sometimes it’s a cable that came off because the door wasn’t properly secured. Sometimes it’s a drum that cracked when the spring tension was incorrectly set. We’re not saying this to generate business — we’re saying it because we’ve seen it enough times that the pattern is real.” — The Team at Garage Door and More
What About Extension Springs: Are Those Safer to DIY?
Extension springs are under less tension than torsion springs, which leads some homeowners to assume they’re a safer DIY option. They’re not safe to replace without proper knowledge, though the failure mode is different. Extension springs that break can thrash violently if safety cables aren’t properly threaded through them, and improperly installed safety cables are a common DIY error. A spring that releases from an extension system without a properly routed safety cable can travel several feet with enough force to cause serious injury or damage.
Extension spring systems also require matched tension on both sides of the door. Installing one new spring without replacing the other, or installing springs with mismatched tension ratings, creates an imbalanced door that tracks unevenly and puts asymmetric load on the opener and hardware. For a full comparison of the two spring systems and what replacement involves for each, our guide on torsion vs. extension springs covers the differences in detail.
What Legitimate Maintenance Can Homeowners Handle?
There’s a meaningful difference between maintenance tasks that are appropriate for homeowners and repairs that require professional handling. Spring replacement falls squarely in the second category, but there are things you can and should do yourself between professional service visits.
Maintenance tasks appropriate for homeowners:
- Lubrication: Applying white lithium grease or silicone spray to the spring coils, hinges, and rollers is a homeowner task that extends component life. This is not the same as adjusting or replacing springs.
- Visual inspection: Checking for visible rust, fraying cables, or cracked rollers is something any homeowner can do monthly. Identifying problems early means calling a professional before a failure rather than after.
- Balance test: Disconnecting the opener and manually lifting the door to waist height to check whether it stays in place tells you whether the spring tension is still correct. A door that drops or shoots up warrants a professional call.
- Hardware check: Looking for loose bolts on track brackets and hinges is a low-risk visual task. Tightening loose hardware is appropriate for homeowners; adjusting tension components is not.
Our post on how to maintain your garage door draws a clear line between homeowner maintenance and professional repair across every system component. For spring-specific work beyond lubrication, the right call is always a professional.
Our Technicians Handle Spring Repairs Safely Across Charlotte
Spring replacement is a routine service for our team and a serious safety situation for anyone attempting it without training and proper tools. We stock the correct spring specifications for standard residential doors across the Charlotte area and complete most spring replacements in under 90 minutes.
If your spring is broken or you suspect it’s losing tension, reach out to schedule a service appointment with Garage Door and More. We serve Charlotte and the surrounding communities and can address most broken spring repairs the same day you call.