Getting ready for a new garage door installation means more than just picking out a style you like. Charlotte homeowners who take time to prepare their property and understand the process can expect a smoother installation day and better long-term results. This guide walks you through the practical steps you need to complete before your installation team arrives.
What Should You Measure Before Installing a New Garage Door?
Accurate measurements form the foundation of a successful installation. Your new door needs to fit the opening precisely, and even small errors can cause delays or require expensive adjustments. Professional installers will verify all measurements, but knowing these numbers ahead of time helps you select the right door and avoid surprises.
Key measurements you need to take:
- Width and height of the opening: Measure the width at the widest point and the height from the floor to the bottom of the header. Take measurements at three different points for each dimension to account for any irregularities in the structure.
- Headroom clearance: Measure the space between the top of the opening and the ceiling. Most standard doors require at least 10-12 inches of headroom, though low-headroom kits exist for tighter spaces. This space houses the door’s track system when the door opens.
- Side room on both sides: Check the distance from each side of the opening to the nearest wall or obstruction. You typically need 3-4 inches on each side for the vertical tracks. This measurement affects which hardware configuration will work in your garage.
- Backroom depth: Measure from the garage door opening straight back into the garage. A standard sectional door needs at least as much backroom as the door is tall, plus about 18 inches for the opener mechanism.
“We see homeowners surprised by backroom requirements more than any other measurement. If you park vehicles or store items close to the door opening, you might need to rearrange your space before installation day.” – The Team at Garage Door and More
Standard garage door sizes in Charlotte homes:
| Door Type | Width | Height | Common Uses |
|---|---|---|---|
| Single Car | 8-10 feet | 7-8 feet | Standard residential garages |
| Double Car | 16 feet | 7-8 feet | Two-car garages |
| RV/Oversized | 8-18 feet | 10-14 feet | RVs, boats, commercial vehicles |
| Custom | Varies | Varies | Unique architectural needs |
How Do You Clear and Prepare the Installation Area?
Installation crews need clear access to your garage door opening, both inside and outside the structure. Preparing the workspace ahead of time saves hours on installation day and reduces the risk of damage to your belongings. Think of this preparation as creating a temporary work zone that gives technicians room to move safely with heavy materials and equipment.
Inside the garage preparation steps:
- Remove all stored items: Clear everything within 6 feet of the door opening and along both side walls where tracks will mount. This includes storage shelves, bikes, lawn equipment, and boxes. Move items to another location rather than just shifting them to the center of the garage.
- Disconnect the existing opener: If you have an old garage door opener, unplug it from the electrical outlet. The installation team will handle disconnecting the opener from the door itself, but unplugging it prevents accidental activation during removal.
- Clear overhead space: Remove hanging items like bicycles, kayaks, or overhead storage racks near the door. The team needs clear access to the ceiling area where they’ll install tracks and opener rails.
- Protect nearby items: Cover any remaining items, workbenches, or vehicles with drop cloths. Door removal and installation create dust and debris, especially if you have an older door.
Outside preparation requirements:
- Create a staging area: The crew needs space to lay out door panels, typically 12-15 feet in front of your garage. If this area is your driveway, make sure vehicles are moved and the space stays clear throughout the installation.
- Trim vegetation: Cut back bushes, trees, or plants within 3 feet of the door opening. Branches or shrubs can interfere with precise installation and damage new panels.
- Check ground level: The installation team needs a relatively level surface in front of the garage. If you have significant drainage issues or an uneven driveway, let the installers know ahead of time.
- Ensure driveway access: The installation truck needs to park close to your garage. Make sure there’s clear access from the street to your driveway without obstacles like basketball hoops or yard decorations blocking the path.
“The most common delay we encounter is unexpected items in the workspace. When homeowners have everything cleared before we arrive, we can focus on the installation instead of moving belongings.” – The Team at Garage Door and More
What Structural Issues Should You Address Before Installation?
Your garage structure needs to be sound before a new door goes in. Installation teams can spot obvious problems, but addressing structural concerns ahead of time prevents installation delays and keeps costs predictable. A new door weighs anywhere from 150 to 400 pounds depending on material and size, and your garage needs to support that weight properly.
Structural elements to inspect:
- Door frame condition: Check the wood framing around your garage door opening for rot, water damage, or insect infestation. Press on the wood with a screwdriver – if it sinks in easily, the wood needs replacement. Damaged framing can’t hold mounting hardware securely.
- Header beam integrity: The horizontal beam above your door opening carries the door’s weight and the mechanical components. Look for sagging, cracks, or signs of stress. This beam needs to be properly sized for your door’s weight and width.
- Wall plumb and square: Use a level to check if the side jambs are plumb (perfectly vertical). Walls that lean in or out can cause the door to bind or create gaps that let in weather. Out-of-plumb walls might need shimming or adjustment before the door installs.
- Foundation and floor condition: Inspect where the garage floor meets the door opening. Cracks, settling, or erosion can affect door alignment. The floor should be relatively level – a slope greater than 1 inch across the door width can cause operational problems.
- Ceiling joist capacity: If you’re installing an automatic opener, the ceiling joists need to support the opener’s weight plus the operating stress. Older homes might have ceiling joists that need reinforcement.
Common structural problems and solutions:
| Problem | Signs to Look For | Typical Solution | Urgency Level |
|---|---|---|---|
| Rotted framing | Soft wood, discoloration, insect holes | Replace affected sections before installation | Must fix before installation |
| Inadequate header | Sagging, cracks, undersized beam | Reinforce or replace header beam | Must fix before installation |
| Out-of-level floor | Gap under closed door, door doesn’t sit flat | Level with self-leveling compound or threshold | Fix for best performance |
| Weak ceiling joists | Visible sagging, cracks in ceiling | Add reinforcement blocking between joists | Required for opener installation |
| Crumbling concrete | Loose chunks, deep cracks, spalling | Repair or replace concrete threshold | Fix for proper seal |
How Should You Prepare Your Electrical System?
Modern garage doors rely on electrical power for opening mechanisms, lighting, and safety features. Your electrical system needs to meet current codes and provide reliable power to the new equipment. Charlotte follows the National Electrical Code with some local amendments, and your installation needs to comply with these standards.
Electrical requirements to verify:
- Dedicated circuit availability: Garage door openers work best on a dedicated 15-20 amp circuit. Check your electrical panel to see if you have a circuit labeled for the garage. If your garage shares a circuit with other loads, you might need an electrician to add a dedicated line.
- Outlet placement: The National Electrical Code requires a GFCI-protected outlet within 6 feet of the opener motor. The outlet should be on the ceiling near where the opener will mount, not on a wall where you might plug in other tools or equipment.
- Proper wiring gauge: The existing wiring should be at least 14-gauge for a 15-amp circuit or 12-gauge for a 20-amp circuit. Undersized wiring can cause the opener to malfunction or create a fire hazard. If you have aluminum wiring, inform your installer – it requires special connectors.
- Grounding and bonding: Your electrical system needs proper grounding. Check that the garage outlet has three prongs (ground, neutral, and hot) and test it with an outlet tester to verify correct wiring. Improper grounding creates shock hazards.
- Surge protection: Charlotte experiences frequent thunderstorms during spring and summer. A surge protector designed for garage door openers protects your investment from lightning-related damage. Some modern openers include built-in surge protection.
“Electrical issues cause about 15% of installation delays in our experience. Having an electrician verify your garage wiring a week before installation saves time and frustration.” – The Team at Garage Door and More
Smart opener considerations:
- Wi-Fi signal strength: If you’re installing a Wi-Fi-enabled opener, check your signal strength in the garage. Concrete or metal siding can block signals. You might need a Wi-Fi extender for reliable connectivity.
- Network security: Smart openers connect to your home network. Make sure your Wi-Fi has a strong password and uses WPA2 or WPA3 encryption before connecting smart devices.
- Backup battery requirements: Some smart openers include battery backup for power outages. Verify where the battery unit will mount and that you have adequate space for it.
What Permits and Inspections Do Charlotte Homeowners Need?
Charlotte and Mecklenburg County require building permits for most garage door replacement projects. The permit process protects homeowners by making sure installations meet safety codes and structural requirements. Professional installation companies typically handle permit applications as part of their service, but you should understand what the process involves.
Permit requirements in Charlotte:
- When you need a permit: Charlotte requires permits for new door installations, complete door replacements, and installations that involve structural modifications. Simple maintenance work like broken spring replacement typically doesn’t require a permit.
- Who pulls the permit: Licensed contractors usually pull permits for their work. This ensures they take responsibility for code compliance. If a company asks you to pull the permit yourself, ask why – it might indicate they’re not properly licensed.
- Permit costs and timeline: Garage door installation permits in Mecklenburg County range from $50-150 depending on project scope. The building department typically reviews and approves straightforward installations within 3-5 business days.
- Required documentation: Permit applications need details about the door specifications, installation method, and structural attachment points. Your installer should provide technical drawings or manufacturer specifications as part of the application.
Inspection process expectations:
- Inspection scheduling: The installer schedules an inspection after completing the installation. The county inspector checks that the work matches the approved permit and meets code requirements.
- What inspectors check: Inspections verify proper structural attachment, correct electrical wiring, functional safety features, and appropriate door operation. The inspector looks at mounting bolts, track installation, spring tensioning, and safety sensor alignment.
- Passing inspection: If everything meets code, the inspector signs off on the permit and closes it out. You’ll receive documentation that the work was completed properly – keep this for your home records and future property sales.
- Addressing deficiencies: If the inspector finds problems, they’ll note them on the inspection report. The installer needs to correct these issues and schedule a re-inspection. Reputable companies fix deficiencies at no additional cost.
Charlotte building code requirements for garage doors:
| Code Requirement | Specification | Why It Matters |
|---|---|---|
| Safety sensors | Must be installed 6 inches above floor | Prevents door from closing on people or objects |
| Auto-reverse function | Door must reverse within 2 seconds of obstruction | Protects against crushing injuries |
| Manual release | Must be within reach and clearly marked | Allows manual operation during power outages |
| Mounting hardware | Bolts must penetrate framing, not just drywall | Prevents door from pulling loose under stress |
| Wind load rating | Based on Charlotte’s wind zone classification | Ensures door survives severe weather |
How Can You Choose the Right Door for Charlotte’s Climate?
Charlotte’s humid subtropical climate creates specific challenges for garage doors. Summers bring heat and humidity that can warp certain materials, while winter temperature swings stress door components. Selecting a door built for these conditions means fewer repairs and longer service life.
Material performance in Charlotte weather:
- Steel doors with thermal breaks: Steel resists humidity well and holds up to Charlotte’s weather extremes. Look for doors with thermal breaks between the exterior and interior steel layers – these prevent heat transfer and reduce energy loss. Steel also resists the high winds that accompany thunderstorms.
- Aluminum with composite panels: Aluminum frames combined with composite panels offer rust resistance and lighter weight than solid steel. These doors work well in Charlotte’s humidity since aluminum doesn’t rust. The lighter weight puts less stress on springs and openers, extending their service life.
- Wood and wood composite options: Real wood doors need regular maintenance in Charlotte’s humidity – plan on resealing every 2-3 years. Wood composite doors mimic wood’s appearance but resist moisture damage better. If you want the look of wood without the upkeep, composite gives you both.
- Vinyl and fiberglass considerations: These materials resist rust and won’t rot, making them low-maintenance in humid climates. Vinyl can become brittle in cold weather, though Charlotte’s mild winters minimize this concern. Fiberglass resists dents better than steel but costs more.
“We recommend insulated steel doors for most Charlotte homes. They handle our humidity, resist wind damage, and the insulation makes a noticeable difference in garage temperature year-round.” – The Team at Garage Door and More
Insulation value for Charlotte garages:
- R-value basics: R-value measures insulation effectiveness. Higher numbers mean better insulation. For Charlotte’s climate zone, an R-value between 12-18 provides good thermal performance without excessive cost.
- Polyurethane versus polystyrene: Polyurethane foam insulation offers higher R-values per inch and bonds the door layers together, creating a stronger panel. Polystyrene board insulation costs less but provides lower R-values and doesn’t strengthen the door structure.
- Energy savings impact: An insulated garage door can reduce heat transfer by up to 71% compared to an uninsulated door. If your garage shares walls with living spaces or you heat/cool the garage, insulation cuts energy costs noticeably.
- Temperature stability benefits: Insulated doors keep garage temperatures more stable, which protects stored items, vehicles, and anything sensitive to temperature swings. This matters in Charlotte’s summer heat and winter cold snaps.
What Safety Features and Upgrades Should You Request?
Modern garage doors include multiple safety systems that weren’t standard 20 years ago. If you’re replacing an older door, these safety features represent significant improvements in protection for your family and property. Building codes mandate some features, while others are optional upgrades worth considering.
Required safety features:
- Photoelectric sensors: Two sensors mounted on either side of the door create an invisible beam across the opening. If anything breaks the beam while the door closes, the door immediately reverses. These sensors prevent the door from closing on people, pets, or vehicles.
- Automatic reverse mechanism: If the door encounters resistance while closing, it must reverse direction within 2 seconds. This mechanical safeguard works independently of the photoelectric sensors, providing dual protection against crushing accidents.
- Manual disconnect release: A red handle hanging from the opener track allows you to disconnect the door from the opener motor. This release lets you open the door manually during power outages or opener malfunctions.
- Pinch-resistant panel joints: Newer doors feature panel designs that minimize gaps between sections. This design prevents fingers from getting caught between panels as the door operates.
Valuable optional upgrades:
- Battery backup systems: A battery backup keeps your opener working during power outages. Charlotte experiences power interruptions during thunderstorms and ice events – a backup means you can still access your garage when the power goes out.
- Timer-to-close function: This feature automatically closes the door after a preset time, typically 1-10 minutes. If you forget to close the door, the timer protects your home from opportunistic theft. You can override the timer if you need the door to stay open.
- Vacation mode: This setting disables remote controls while keeping wall-mounted controls active. When you’re away from home, vacation mode prevents someone from accessing your garage with a stolen or duplicated remote.
- Motion detection lighting: LED lights built into the opener provide bright illumination when motion is detected. This lighting improves safety when entering a dark garage and deters potential intruders.
- MyQ or smartphone connectivity: Smart openers let you check door status and control operation from anywhere via smartphone app. You can close the door remotely if you forgot, or open it to let in a delivery person when you’re not home.
Comparison of safety features by door opener type:
| Feature | Basic Chain Drive | Mid-Range Belt Drive | Premium Smart Opener |
|---|---|---|---|
| Photoelectric sensors | Included | Included | Included |
| Auto-reverse | Included | Included | Included |
| Battery backup | Optional | Often included | Included |
| Timer-to-close | Not available | Sometimes included | Included |
| Smartphone control | Not available | Optional | Included |
| Vacation mode | Not available | Optional | Included |
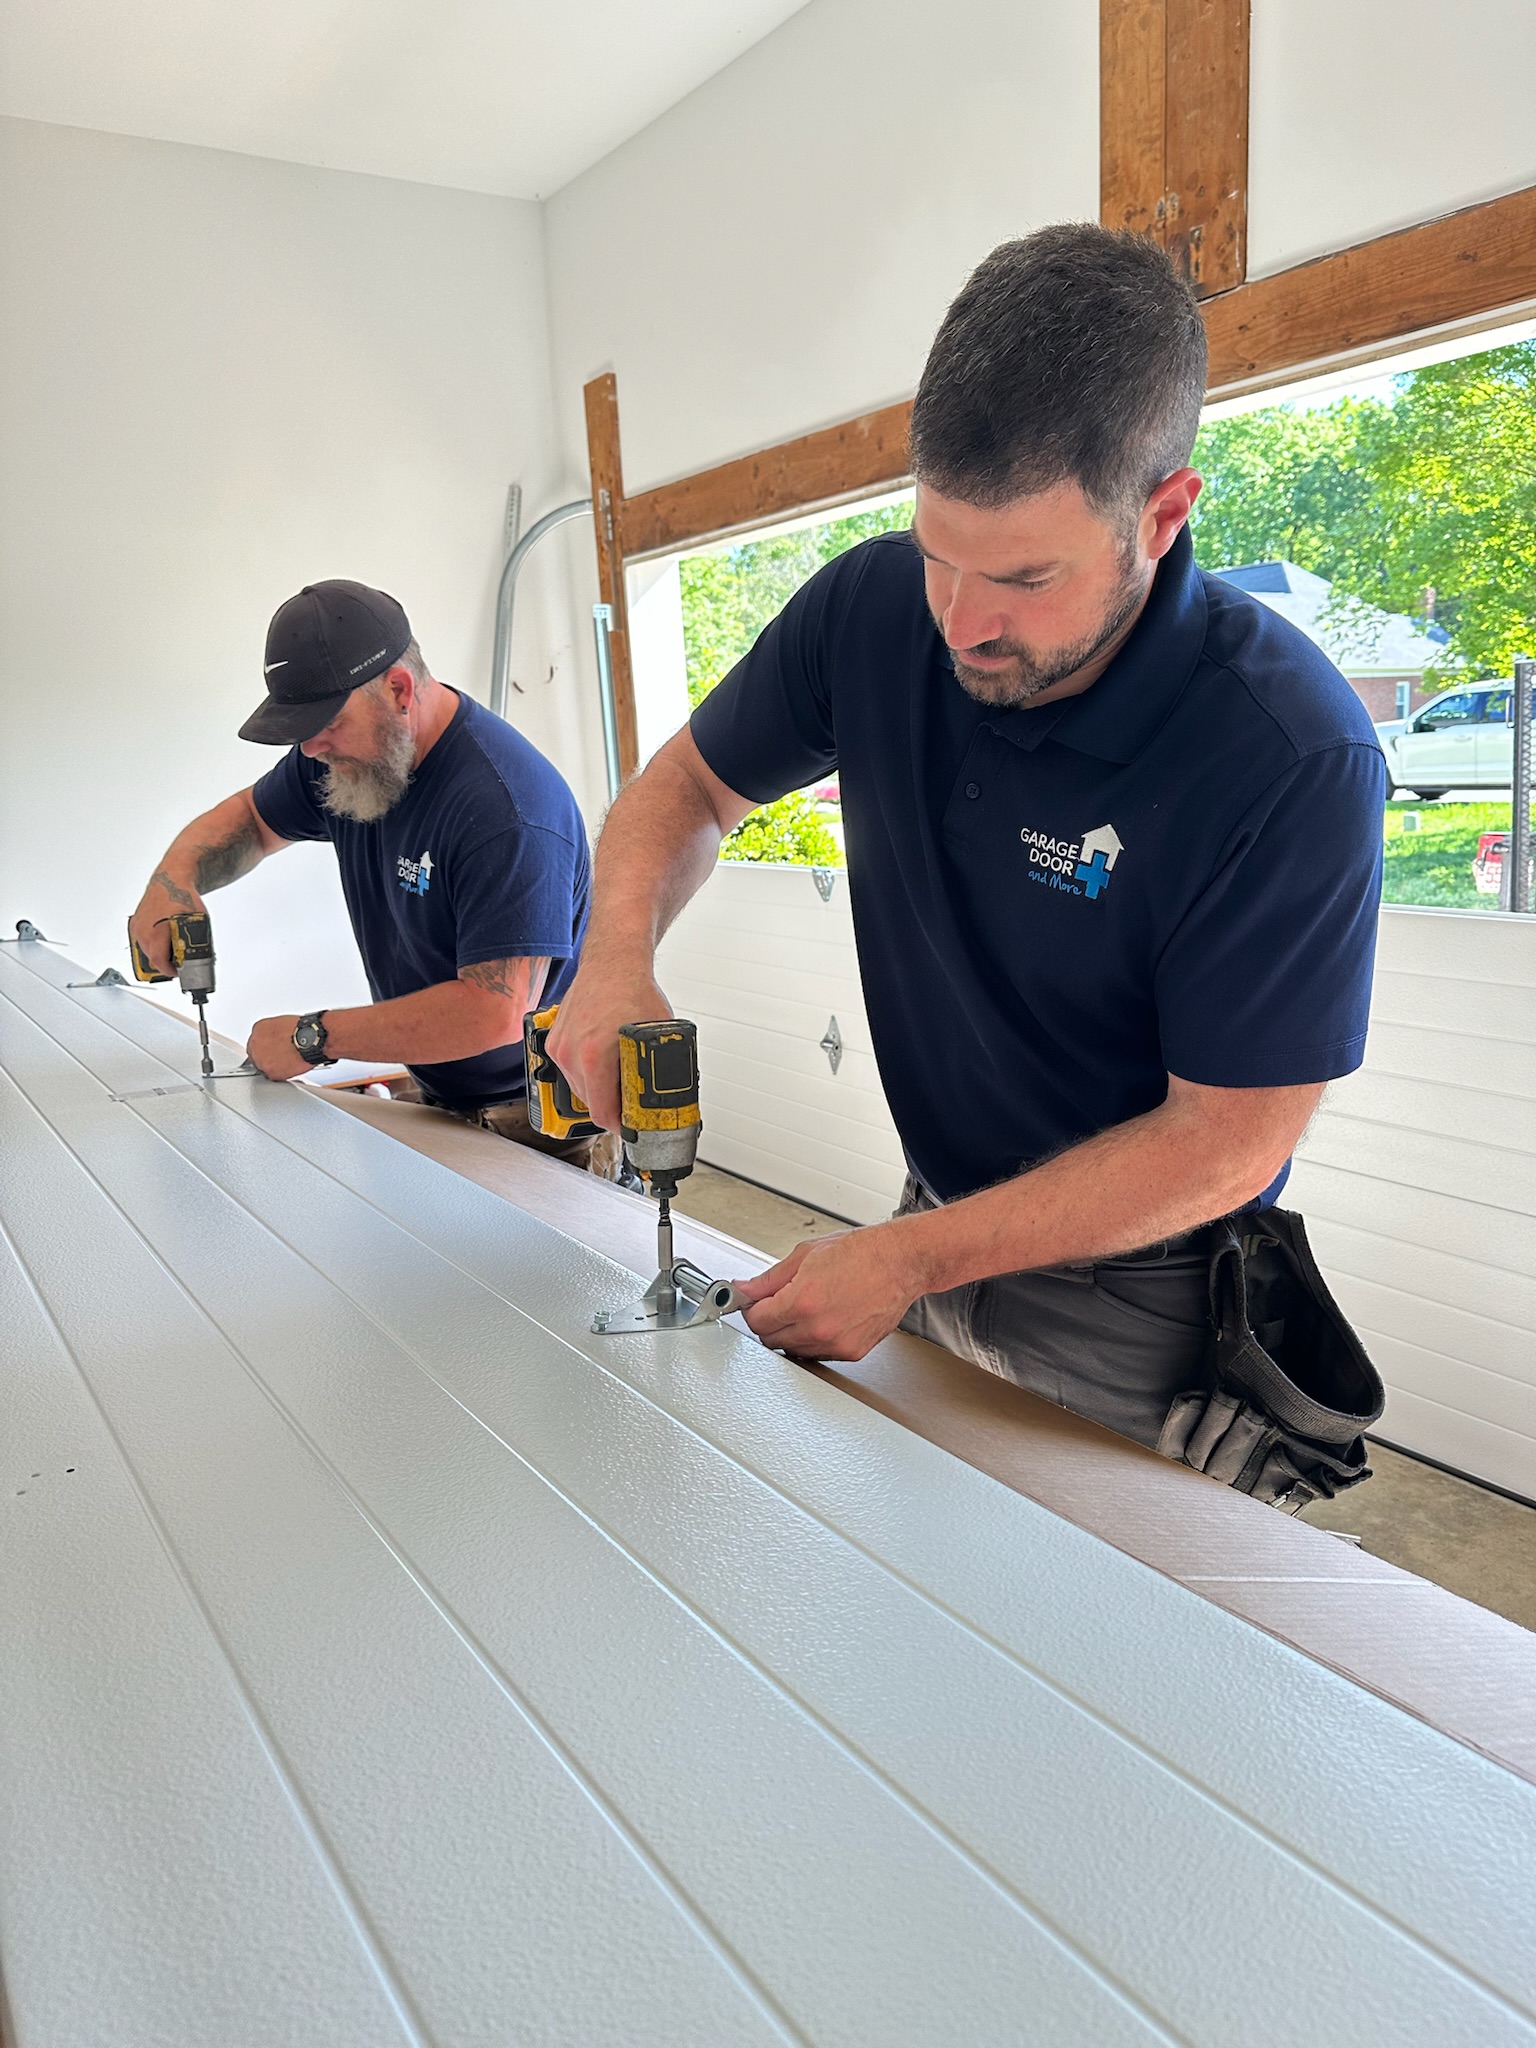
What Should You Expect on Installation Day?
Understanding the installation process helps you prepare for what the crew needs and how long the work takes. Most residential garage door installations take 3-6 hours depending on door complexity and whether you’re also installing a new opener. The timeline extends if structural repairs are needed.
Installation sequence and timeline:
- Old door removal (30-60 minutes): The crew starts by releasing tension from the old door’s springs – this is dangerous work that requires proper tools and training. After safely releasing spring tension, they disconnect the opener, remove the door panels, and take down the old track system. They’ll dispose of the old door and hardware.
- Frame inspection and prep (15-30 minutes): Installers check the door opening for level, plumb, and square. They identify any structural issues that need addressing before the new door goes in. Minor adjustments happen now, while major structural problems might require rescheduling the installation.
- Track and hardware installation (45-90 minutes): The team installs vertical and horizontal tracks, making sure they’re level and properly aligned. They mount the brackets that will hold the door panels and install the spring system mounting hardware. Precision here determines how smoothly your door operates.
- Panel installation and alignment (60-90 minutes): Installers place panels starting from the bottom, connecting each section and checking alignment after each panel. They install rollers and hinges as they build up the door. This process requires patience and precision – rushing creates problems later.
- Spring tensioning and balancing (30-45 minutes): After all panels are in place, technicians install and carefully tension the springs. Proper spring tension balances the door so it stays open at any position and the opener doesn’t work too hard. This step requires specific calculations based on door weight and size.
- Opener installation and setup (45-60 minutes): If you’re installing a new opener, the team mounts the motor unit, installs the rail, connects the door arm, and wires the controls and sensors. They program the opener, test all safety features, and program your remote controls.
- Final adjustments and testing (15-30 minutes): The crew operates the door multiple times, checking for smooth movement, proper seal at the bottom, and correct sensor alignment. They adjust track positioning, lubricate moving parts, and verify all safety features work correctly.
What the installation crew needs from you:
- Access to the work area: Keep the garage and driveway clear throughout the day. If you need to come and go during installation, let the crew know your schedule so they can plan around it.
- Electrical panel access: If you’re installing a new opener, the crew might need to access your electrical panel to verify circuit capacity or reset breakers. Know where your panel is and keep the area accessible.
- Water availability: Installation is physical work, especially in Charlotte’s summer heat. Offering water or letting the crew know where they can fill water bottles is appreciated.
- Pet management: Keep dogs and cats away from the work area. Pets can get injured by door components, and they distract the crew from their work.
- Final walkthrough participation: At the end of installation, the crew will demonstrate door operation and explain maintenance requirements. Ask questions during this walkthrough so you understand how to operate and care for your new door.
“The most successful installations happen when homeowners are available for questions but give the crew space to work. We’ll check in at key points, and we always do a thorough walkthrough at the end.” – The Team at Garage Door and More
Frequently Asked Questions
Do I need to be home during the entire installation?
You should be available at the start so you can show the crew the work area and answer any questions about your preferences. You don’t need to stay the whole time, but someone should be home to handle questions that might come up. Plan to return for the final walkthrough when the crew demonstrates operation and explains maintenance.
Can I install a garage door myself to save money?
Installing a garage door yourself is dangerous because of the high-tension springs and the door’s weight. Springs can cause serious injury if they release unexpectedly. Professional installers have specialized tools and training to handle these hazards safely. Most manufacturers void warranties if the door isn’t professionally installed.
How long should a garage door installation take in Charlotte?
A standard single-door installation takes 3-4 hours, while a double door takes 4-6 hours. Complex installations with custom features or structural repairs can take longer. If you’re installing multiple doors, plan for 6-8 hours of work. Weather delays can extend the timeline during rainy periods.
What happens if it rains on my installation day?
Light rain doesn’t usually stop an installation, though crews might pause during heavy downpours. The installers protect your garage opening during the transition between old and new doors. Charlotte’s frequent afternoon thunderstorms might cause short delays. Most companies will reschedule if severe weather is forecast.
Will the installation crew clean up after they finish?
Professional installers remove all debris from the old door, packaging materials, and installation waste. They sweep the work area and haul away the old door for disposal. You shouldn’t need to do any cleanup after they leave. If the crew leaves a mess, contact the company immediately.
How soon can I use my new garage door after installation?
You can use the door immediately after installation is complete and the final safety checks pass. The installer will operate the door several times during testing, and they’ll have you operate it during the walkthrough to make sure you’re comfortable with the controls.
Do I need to do anything special to maintain my new door?
Monthly visual inspections catch problems early. Check for frayed cables, loose hardware, and worn rollers. Lubricate moving parts every three months using silicone-based lubricant. Test the auto-reverse function monthly by placing a board under the door. Professional maintenance once a year keeps the door operating smoothly.
What warranty coverage comes with a new garage door?
Warranties vary by manufacturer and components. Door sections typically carry 10-25 year warranties against rust, peeling, or cracking. Springs usually have 1-5 year warranties depending on cycle rating. Openers come with 1-5 year mechanical warranties and lifetime warranties on motors. Installation labor warranties range from 1-3 years.
Conclusion
Preparing properly for your garage door installation makes the process smoother and helps you get the most value from your investment. Taking measurements, clearing the work area, addressing structural concerns, and understanding the installation process before your crew arrives sets realistic expectations and prevents delays. The team at Garage Door and More works with Charlotte homeowners every day to install doors that perform reliably in our climate while meeting safety standards.
If you need help with garage door installation, our technicians can assess your specific situation, recommend the right door for your home and budget, and handle all the details from permits to final inspection. Contact us to schedule a consultation and get your garage door project started.